Source Code and Binaries
This section describes how to download and compile the LEADERS toolkit, application and data files, and includes a description of the prerequisite software.
Prerequisite Software
The following list describes the third-party software and tools needed to run and develop the LEADERS system, including instructions on how to install and configure it. The version numbers listed are the lowest version number tested with the LEADERS application.
Operating System
The LEADERS application is a Java based application, which makes it system independent. At the moment the application has been installed and tested on the MS Windows XP Pro, MAC OS X 10.2 and Red Hat Linux 8.0 operating systems.
Java Virtual Machine
A Java 1.4 virtual machine must be present in order to run or develop the application. The JVM is also needed by the servlet engine (Tomcat), that is also required to run the application. There are JVMs available from http://java.sun.com/j2se/1.4.1/download.html along with installation instructions.
Servlet Engine
A Servlet 2.3 compliant servlet engine must be present in order to support servlet operation and dynamic request handling, present in the application. Apache Tomcat is a servlet engine available at http://jakarta.apache.org/tomcat/. Download Tomcat 4.1.nn and follow the installation instructions, also available on the site. See Server Setup for instructions on how to run the LEADERS toolkit and application within Tomcat.
Back to top
CVS
CVS is a version control system used to record the history of source files.
NOTE: CVS is only needed if you want to setup the application from source code.
Installing CVS
- Linux
-
Most of the Linux distributions already have a CVS client installed with the system. To check if CVS is already installed execute the following command in a terminal:
cvs -version. If you get a positive answer from CVS then you're ready to go, otherwise you need to install a client.- Go to http://ccvs.cvshome.org/servlets/ProjectDownloadList and download a client appropriate for your system. If you have a Red Hat system then its advisable to download a RPM, to simplify the installation process.
- Installing from RPM:
- In a terminal window type the following command
rpm -ivh rpm_filename - After the installation process ends, CVS is ready to go, and you can execute the previous version test
- In a terminal window type the following command
- Installing from source:
- Unpack the source by executing the following
command in a terminal:
tar -zxvf source_file - Follow the instructions in the INSTALL file
- Run the version test
- Unpack the source by executing the following
command in a terminal:
- Windows
-
To install a CVS client in windows follow the next steps:
- Download a WinCVS installation file from http://www.wincvs.org/download.html
- Unzip the downloaded zip file and run
Setup.exe-
Its preferable to install WinCVS to
C:\Program Files\GNU\WinCVS
-
Its preferable to install WinCVS to
Checking out files with CVS
The LEADERS files are in two sections.
The toolkit files include the data files, the indexing tools, and the web services. A direct connect client application is also included with the toolkit files for test and debugging purposes.
The wsclient files include all the files required to run the web services application client. The wsclient application may be installed on the same server as the toolkit or on an entirely separate server.
NOTE: Both sets of files are needed for the system to operate.
The following instructions assume that a cvs client is running on your local machine and that you have created a directory for your source files. You should move to this directory before invoking the cvs commands given below.
Details about the CVS server:
- Server
-
cvs.sourceforge.net - CVSROOT
-
/cvsroot/leaders - Authentication Protocol
-
pserver
- Linux
-
- Start a shell
-
Enter
cvs -d :pserver:anonymous@cvs.sourceforge.net:/cvsroot/leaders login -
Enter
cvs -d :pserver:anonymous@cvs.sourceforge.net:/cvsroot/leaders checkout module_name. The module_names are:toolkitandwsclient. You need to execute the checkout procedure for each module_name. - Wait until CVS has finished
- You now have the LEADERS application source code
-
To keep the checked out source code up to date, enter
cvs -d :pserver:anonymous@cvs.sourceforge.net:/cvsroot/leaders update -dP -
Enter
cvs -d :pserver:anonymous@cvs.sourceforge.net:/cvsroot/leaders logoutto logout from the CVS server
- Windows
-
- Start WinCVS
- Click on admin->preferences
-
In "Enter the CVSROOT:" enter
:pserver:anonymous@cvs.sourceforge.net:/cvsroot/leaders - In "Authentication:" choose "passwd file on the cvs server"
- Click "Ok"
- Click admin->login
- Click "create->checkout module"
- Module names and paths on the server are
toolkitandwsclient. - Choose a directory to put the source code in
- Go to the "Checkout-options" tab and select "By revision/tag/branch" and enter "HEAD"
- Click "Ok"
- If everything goes well, messages will start to appear in the log window
- Wait until you see "*****CVS exited normally with code 0*****" in the log window
- You now have the LEADERS application source code
- To keep the checked out source code up to date, click "modify->update"
For further instructions on how to use the WinCVS client see http://www.wincvs.org/winhtml/wincvs11.htm.
Back to top
Apache Ant
Apache Ant is a Java-based build tool. We use ant to automate development tasks like compiling the source code, or creating a distribution version of an application, etc. This tasks are defined in an XML file named build.xml.
To install ant, download a binary distribution from http://ant.apache.org/bindownload.cgi. After download, follow the installation instructions from http://ant.apache.org/manual/index.html.
Now that Ant is installed and the LEADERS application source files have been checked out code using CVS
(see CVS), we can build the toolkit and wsclient applications by opening a terminal or console session and moving to the toolkit and wsclient directories and typing ant dist. In each case this task creates three files in
the dist sub-directory of the toolkit and wsclient directories, namely:
In the directory toolkit/dist
- leaders.jar
- leaders.war
- leaders-archive.zip
In the directory wsclient/dist
- leaderswsclient.jar
- leaderswsclient.war
- leaderswsclient-archive.zip
The .jar files are not required for deployment of the application in Tomcat.
It is possible to build the application with the direct client for debugging only and ignore the wsclient. This is achieved by typing ant distNoClient instead of ant dist in the toolkit directory.
Ant is supported by the Apache Software Foundation.
Back to top
Server Setup
This section describes how to install and configure the server side components that will support the LEADERS toolkit services operation and deployment of the LEADERS Application
Initialising Tomcat
After installing all the prerequisite software, and compiling the application and data files, we are ready to install the LEADERS toolkit and application on the Tomcat server by following the steps below:
NOTES:
- We are going to refer to
TOMCAT_HOMEas the directory where tomcat is installed. - These instructions assume that the toolkit and wsclient applications are installed on the same Tomcat server along with the data files contained within the
-archive.zipfiles. To install on separate servers use the same steps but on different machines. The toolkit and the wsclient applications each require a Tomcat server to run. The data files may be located on any machine which is reachable via http from the wsclient and toolkit servers.
Steps
- Create copies of the application archive
zipfiles as described above - Create copies of the application binary
warfiles as described above - Extract the application archive zip files into directories that Tomcat can access. There must be separate directories for the toolkit and wsclient archives. For the purposes of the demonstrator, we have created
TOMCAT_HOME/archive/leadersandTOMCAT_HOME/archive/leaderswsclientdirectories to hold the data files for the toolkit and application respectively. - Copy the
warfiles into theTOMCAT_HOME/webappsdirectory - Start Tomcat to expand the
warfiles - See the Application Configuration section for more details about configuring the application
- Copy
xalan-2.3.1.jarandxercesImpl-2.0.0.jarfromTOMCAT_HOME/webapps/LEADERS/WEB-INF/libinto theTOMCAT_HOME/common/endorseddirectory. This ensures that the XML parsers that will be used by the application are the correct ones, and not the default parsers of your machine - Restart Tomcat
Back to top
Application Layout
This section describes the organisation of the LEADERS application as a web application conformant to
the Servlet 2.3 Specification, i.e. as it will appear within the TOMCAT_HOME directory structure when the .zip and .war files have been installed according to the instructions above. The commentary below applies to both the toolkit files and the application files, although they may be on entirely separate Tomcat servers.
The LEADERS toolkit/application appears as a hierarchy of directories and files. The hierarchy can
be accessed in the application distribution war file, or, when expanded by the servlet container (Tomcat)
in a directory under the webapps directory. By default the toolkit is in a webapps/leaders and the application in webapps/leaderswsclient. Besides the directory under webapps,
there will be other directories which hold the data files. In the demonstrator these are within the TOMCAT_HOME/archive directory as described above.
These directories contain the EADs, EACs, TEIs and Images, used for indexing and display. In order
for the application to know where those directories are, the leaders.properties file
must be configured.
The webapps/leaders and webapps/leaderswsclient directories, when installed in Tomcat, will have the following
hierarchy:
- Top-level directory i.e. leaders and leaderswsclient
- This directory, that will have the same name as the war file, is also the document root of
the application. In here is the
sitemap.xmapfile used by Cocoon to control all of the application flow. This file is automatically created at the application startup. Also here are the files (or directories) used to build the application user interface. In the case of leaders these are: - /css
- Contains the cascading stylesheets
- /js
- Contains a JavaScript file, which displays an error message.
- /stylesheets
- Contains the
.xslstylesheets used to create the hit list and detailed displays. - /xml
- Contains the welcome, search and on-line help files with related images.
- /xsp
- Contains the
.xspscripts used to pass parameters through the application. - /WEB-INF/
- This directory contains files and directories that are not visible to the application's users. Among the files are the configuration files, that determine the application behaviour and functionality.
- /WEB-INF/classes/
- This directory contains the Java class files, and associated resources, of the LEADERS application.
- /WEB-INF/lib/
- This directory contains JAR files required by the LEADERS application.
Application Configuration
Before using the LEADERS application, a property with the location of the LEADERS archive must be set up for both the toolkit and wsclient applications.
The configuration of the LEADERS archive properties is done in the Tomcat Web Server Administration Tool:
- Open the tool and go into
Tomcat Server/Service/Host/Context(/leaders)/Resources/Environment Entriesand click on theleaders.archiveentry - Change the value according to your installation. NOTE: If you are under a Windows operating
system you should use double backslash for the directory separator. For instance if the leaders archive was under
c:\archive, the value would bec:\\archive - Save the changes by clicking on the Save button
- Commit the changes to update the server, by clicking on the Commit changes button
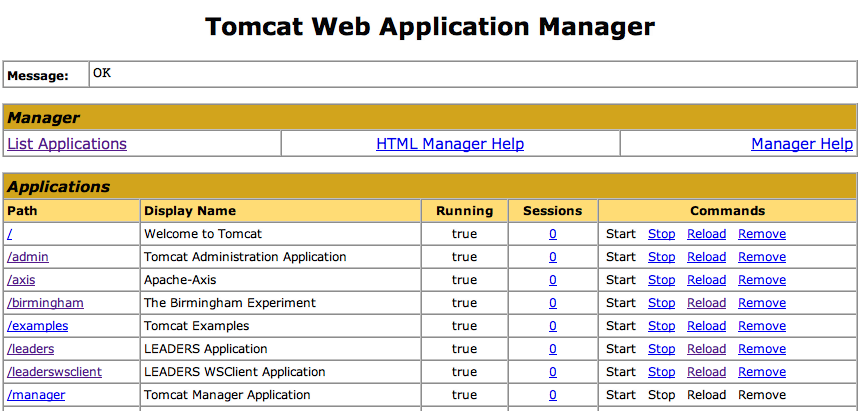
- Start or Reload the LEADERS application in the Tomcat Web Application Manager
- Repeat the steps above for the leaderswsclient context

To run the application, point your web browser at http://tomcat_url:port/leaderswsclient/.
The LEADERS application also has an additional file for more detailed configuration.
This file, leaders.properties is in the LEADERS archive directory.
To configure the properties, just open the properties files with a text editor. Changes made to the properties will only take effect after saving the properties file and restarting the Tomcat engine.
The properties have the following format: property.name=property_value.When
configuring the application, look carefully at the property description (which appears before the
property), before changing the property_value.
NOTE: Changing a property.name can cause unexpected
application behaviour.
Sample leaders.properties file
# ====================================================================================== #
# LEADERS APPLICATION PROPERTIES                                                         #
# ====================================================================================== #

#
# GLOBAL PROPERTIES
application.name=LEADERS
# The application URL. If the application is running behind a firewall or a proxy, use the
# URL to access the application from outside the firewall or proxy
application.url=http://127.0.0.1:8080/leaders

#
# BASE DIRECTORIES PROPERTIES
# This properties are going to be passed as parameters to the indexing stylesheet and are
# also used for document display
eac.base.dir=/archive/docs/eacdocs
ead.base.dir=/archive/docs/eaddocs
img.base.dir=/archive/docs/images
tei.base.dir=/archive/docs/teidocs
xsl.base.dir=/archive/docs/stylesheets

#
# INDEX PROPERTIES
# The directory of the files to create the XML files for indexing
files.to.xml.dir=/archive/docs/eaddocs
# The stylesheet to generate the XML files for indexing
files.to.xml.xsl=/Users/miguel/Develop/java/leaders/bookmarc/web/stylesheets/index/eadindex.xsl
# The directory of the XML files to create the index
xml.to.index.dir=/archive/indexxml
# The index directory
index.dir=/archive/index
# Type of index creation
# Options are:
#	. true: overwrites previous index, if it exists, otherwise creates new index
#			the previous index gets unavailable during creation
#	. false: updates the existing index, if it exists, otherwise creates new index
#			 the index is always available
index.create=true

#
# WEB SERVICES PROPERTIES
# The Web Service URL. If the Web Services are running behind a firewall or a proxy, use
# the URL to access the application from outside the firewall or proxy
ws.url=http://127.0.0.1:8080/leaders/services/IndexSearchWS
# The Web Service deployment descriptor file location, relative to the WEB-INF directory
ws.deploy.file=classes/uk/ac/ucl/leaders/ws/deploy.wsdd
# The Web Service undeployment descriptor file location, relative to the WEB-INF directory
ws.undeploy.file=classes/uk/ac/ucl/leaders/ws/undeploy.wsdd

#
# LOGGER PROPERTIES
# The logger output directory
logger.dir=/archive/logs
# The logger identification
logger.id=uk.ac.ucl.leaders
# The detail of logger information. Options are: debug, info, warn, error
logger.level=debug
# Format of the logger messages
logger.pattern=%d{dd-MM-yyyy HH:mm:ss} %p [%t] {%F} - %m%n
logger.date.pattern='.'yyyy-MM-dd
Back to top